Do you want to hear that part again, practice the solo a few hundred times or just play along to a cool groove for an hour? Looping allows you to focus on a section of the song you are working on. You can repeat any region of a song to listen carefully or to practice along.
There are several features that apply to loops including AutoLoop, PlayNext and the Loop Trainer.
Reveal loop controls:
On iPhone: Tap the ![]() (or
(or ![]() ) Mode Selector and select
) Mode Selector and select ![]() Loop Mode.
Loop Mode.
On iPad: Tap ![]()
Loop sliders
The A and B sliders are displayed with the Loop Controls are activated. Drag these in the song view or the zoomed view windows to set the start and end of a loop.
The time appears above the A/B slider handle in the waveform when they are selected or dragged. Dragging the slider to the edge of the screen scrolls the zoomed view. Tap the slider to move the playhead to the slider.
Tap the A or B button to move the corresponding slider to the current playhead position and the![]() button to reset the sliders back the start and end of the song.
button to reset the sliders back the start and end of the song.
Use the wave form to help position the sliders in a valley for a smoother loop.
Create and repeat a loop
- Tap Play. Listen. Get ready.
- Tap A where you want the loop to begin. The A Slider jumps to the playhead.
- Tap B where you want the loop to end. The B Slider jumps to the playhead.
- Tap
 to enable looping and listen to your loop.
 - Adjust the Loop ends by dragging the sliders or using the Fine Adjust controls.
- Tap
 button to reset the sliders back the start and end of the song.
While the song is paused navigate to anywhere in the song, such as an existing Audiomark, and tap the A or B buttons to move the sliders.
Loop controls
| A | Position A | Move the A Slider (loop start) to the playhead position |
| B | Position B | Move the B Slider (loop end) to the playhead position |
| Clear A & B | Reset Sliders. Move A to beginning and B to end of song | |
|
|
Enable Looping | Enable/disable repeating of the selected portion of the song |
Loop Mode
You can reveal the Loop Mode controls with a Long Press / Right-Click of the ![]() Loop button:
Loop button:
- Toggle between Loop Forever or
 Loop Once.
 - Enable
 AutoLoop
AutoLoop
When you enable ![]() AutoLoop, the A and B sliders (loop start and end) will automatically move to the marks immediately surrounding the Playhead.
AutoLoop, the A and B sliders (loop start and end) will automatically move to the marks immediately surrounding the Playhead.
This allows you to easily play loops between Marks:
- Simply navigate the Playhead to the section you want to loop and the A and B sliders will be set automatically.
See Play multiple loops (in succession).
Modify looping behaviour
| Delay | Add a configurable delay (silence) before repeating the loop. Note: This is a three state, button see Loop delay. | |
| Trainer | Enable/disable Step-It-Up Trainer (old |
Save a loop
You can save your loop in a Loopmark. A Loopmark has a start position and an an end position. You can edit the Loopmark's label and and short label and add a note.
When navigating through a song and you arrive at a Loopmark, the A and B sliders will automatically be positioned to the start time and end time of the Loopmark.
| |
Add Loopmark |
Create a Loopmark (old |
| Delete Loopmark | Delete a Loopmak (old Add button changes to Delete when positioned on a Loopmark |
Fine Adjustments
First choose what to adjust: the loop ends ![]() and
and ![]() or the entire loop
or the entire loop ![]() . Use the scroll slider to adjust loop ends or the Loop Adjustment buttons to move or resize the entire loop.
. Use the scroll slider to adjust loop ends or the Loop Adjustment buttons to move or resize the entire loop.
Make fine adjustments while the loop is playing and slow down the tempo to get it just right.
| Select A | Select A and use the loop adjustment control to modify the A slider (loop start) position | |
| Select B | Select B and use the loop adjustment control to modify the B slider (loop end) position | |
| The loop adjustment scroll slider is used to change the start (A) and end (B) positions. | ||
| Select Loop | Select Loop, to reveal the Loop Adjustment Buttons, and shift the entire loop position or adjust the loop’s duration. | |
Loop adjustment buttons 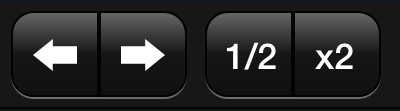
| Shift Left | Shift the loop to the left one loop length. B Slider is moved to A Slider position. | |
| Shift Right | Shift the loop to the right one loop length. A Slider is moved to B Slider position. | |
| Nudge Left | Nudge the entire loop to the left a smidgen. | |
| Nudge Right | Nudge the entire loop to the right a smidgen. | |
| 1/2 | Half Loop | Reduce the length of the loop by half. |
| x2 | Double Loop | Double the length of the loop. |
Once you have good loop (say 8 bars), the loop adjustments allow you to move it through the song. Start at the beginning and work through the song, or start with eight bars and then practice sixteen and then thirty-two.
Loop Delay 
Add a delay between loops. The Loop Delay button cycles through three values:
| Off | No delay. | |
| On | Delay the number of seconds configured in Settings before starting the loop again. | |
| Loop | Delay a time equal to the length of the loop. |
A Loop Delay count down timer is displayed to show you when the loop will start.
Change the delay time in  Settings > Durations:
| Loop Delay | The length of delay (silence) before repeating a loop when loop delay is enabled |
"Step-It-Up" trainer

Use the Step-It-Up Trainer to automatically change the tempo (or pitch) after each (loop) iteration. You set the starting and ending values for tempo and pitch, choose the number of “Steps”, the number of times a step repeats and the behaviour when it is all done.
Start slow and speed up the tempo to practice and master any section of a song. Use the music as a backing track or play along to master a difficult solo. Build up to 1.5X the speed so you can kill it on stage.
Comments
0 comments
Please sign in to leave a comment.